一、Github Clone项目镜像
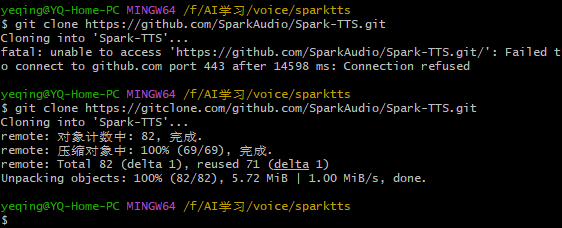
Spark-TTS项目https://github.com/SparkAudio/Spark-TTS.git
1
git clone https://github.com/SparkAudio/Spark-TTS.git
1.1 腾讯cloud studio云平台网络代理
简单说遇到网络不通例如访问Github打开代理,其他网络关闭代理。
1
2
3
4
5
6
7
git config --global http.proxy http://proxy.cloudstudio.work:8081
git config --global https.proxy http://proxy.cloudstudio.work:8081
export http_proxy = http://proxy.cloudstudio.work:8081
export HTTP_PROXY = http://proxy.cloudstudio.work:8081
export https_proxy = http://proxy.cloudstudio.work:8081
export HTTPS_PROXY = http://proxy.cloudstudio.work:8081
1
2
3
4
5
6
git config --global --unset http.proxy
git config --global --unset https.proxy
unset http_proxy
unset HTTP_PROXY
unset https_proxy
unset HTTPS_PROXY
1.2 PC Github不通的办法
2025年3月更新!18个Github镜像站,国内更快部署下载
找到可用镜像站,例如[方达极客社区]https://gitclone.com
 1
 2
 3
 4
 5
 6
 7
 8
 9
10
11
12
13
方法一(替换URL)
git clone https://gitclone.com/github.com/tendermint/tendermint.git
方法二(设置git参数)
git config --global url."https://gitclone.com/" .insteadOf https://
git clone https://github.com/tendermint/tendermint.git
方法三(使用cgit客户端)
cgit clone https://github.com/tendermint/tendermint.git
1
git clone https://github.com/SparkAudio/Spark-TTS.git
替换为
1
git clone https://gitclone.com/github.com/SparkAudio/Spark-TTS.git
二、Conda 环境
按官方说明,建立python3.12的虚拟环境,安装依赖,
装依赖使用指定国内源那条命令pip install -r requirements.txt -i https://mirrors.aliyun.com/pypi/simple/ --trusted-host=mirrors.aliyun.com
1
2
3
4
5
6
conda create -n sparktts -y python = 3.12
conda activate sparktts
pip install -r requirements.txt
# If you are in mainland China, you can set the mirror as follows:
pip install -r requirements.txt -i https://mirrors.aliyun.com/pypi/simple/ --trusted-host= mirrors.aliyun.com
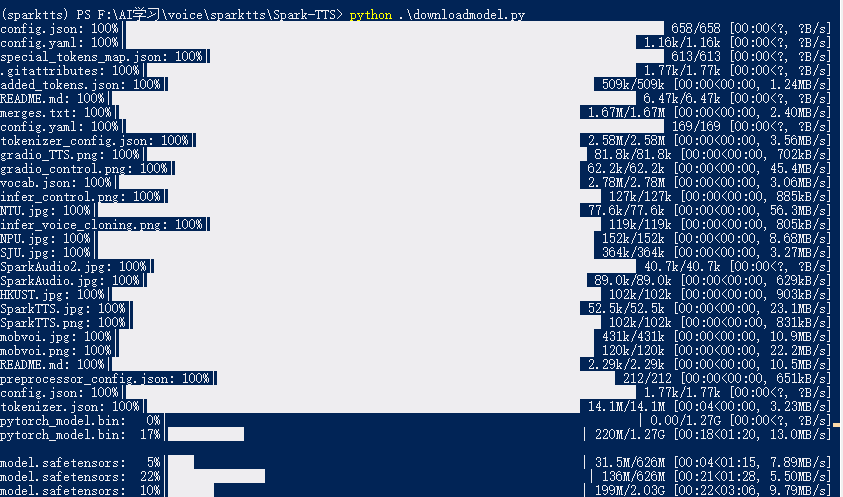
三、模型下载
官网说明给了两种方式,用其中一种下载就可以。
3.1 huggingface方式下载
1
2
3
from huggingface_hub import snapshot_download
snapshot_download ( "SparkAudio/Spark-TTS-0.5B" , local_dir = "pretrained_models/Spark-TTS-0.5B" )
3.2 git方式
1
2
3
4
5
6
mkdir -p pretrained_models

# Make sure you have git-lfs installed (https://git-lfs.com)
git lfs install

git clone https://huggingface.co/SparkAudio/Spark-TTS-0.5B pretrained_models/Spark-TTS-0.5B
四、运行测试
4.1 命令行
这两种都是服务器上用比较方便,PC这不方便测
bash 环境
1
2
cd example
bash infer.sh
python命令行
1
2
3
4
5
6
7
python - m cli . inference \
-- text "text to synthesis." \
-- device 0 \
-- save_dir "path/to/save/audio" \
-- model_dir pretrained_models / Spark - TTS - 0.5 B \
-- prompt_text "transcript of the prompt audio" \
-- prompt_speech_path "path/to/prompt_audio"
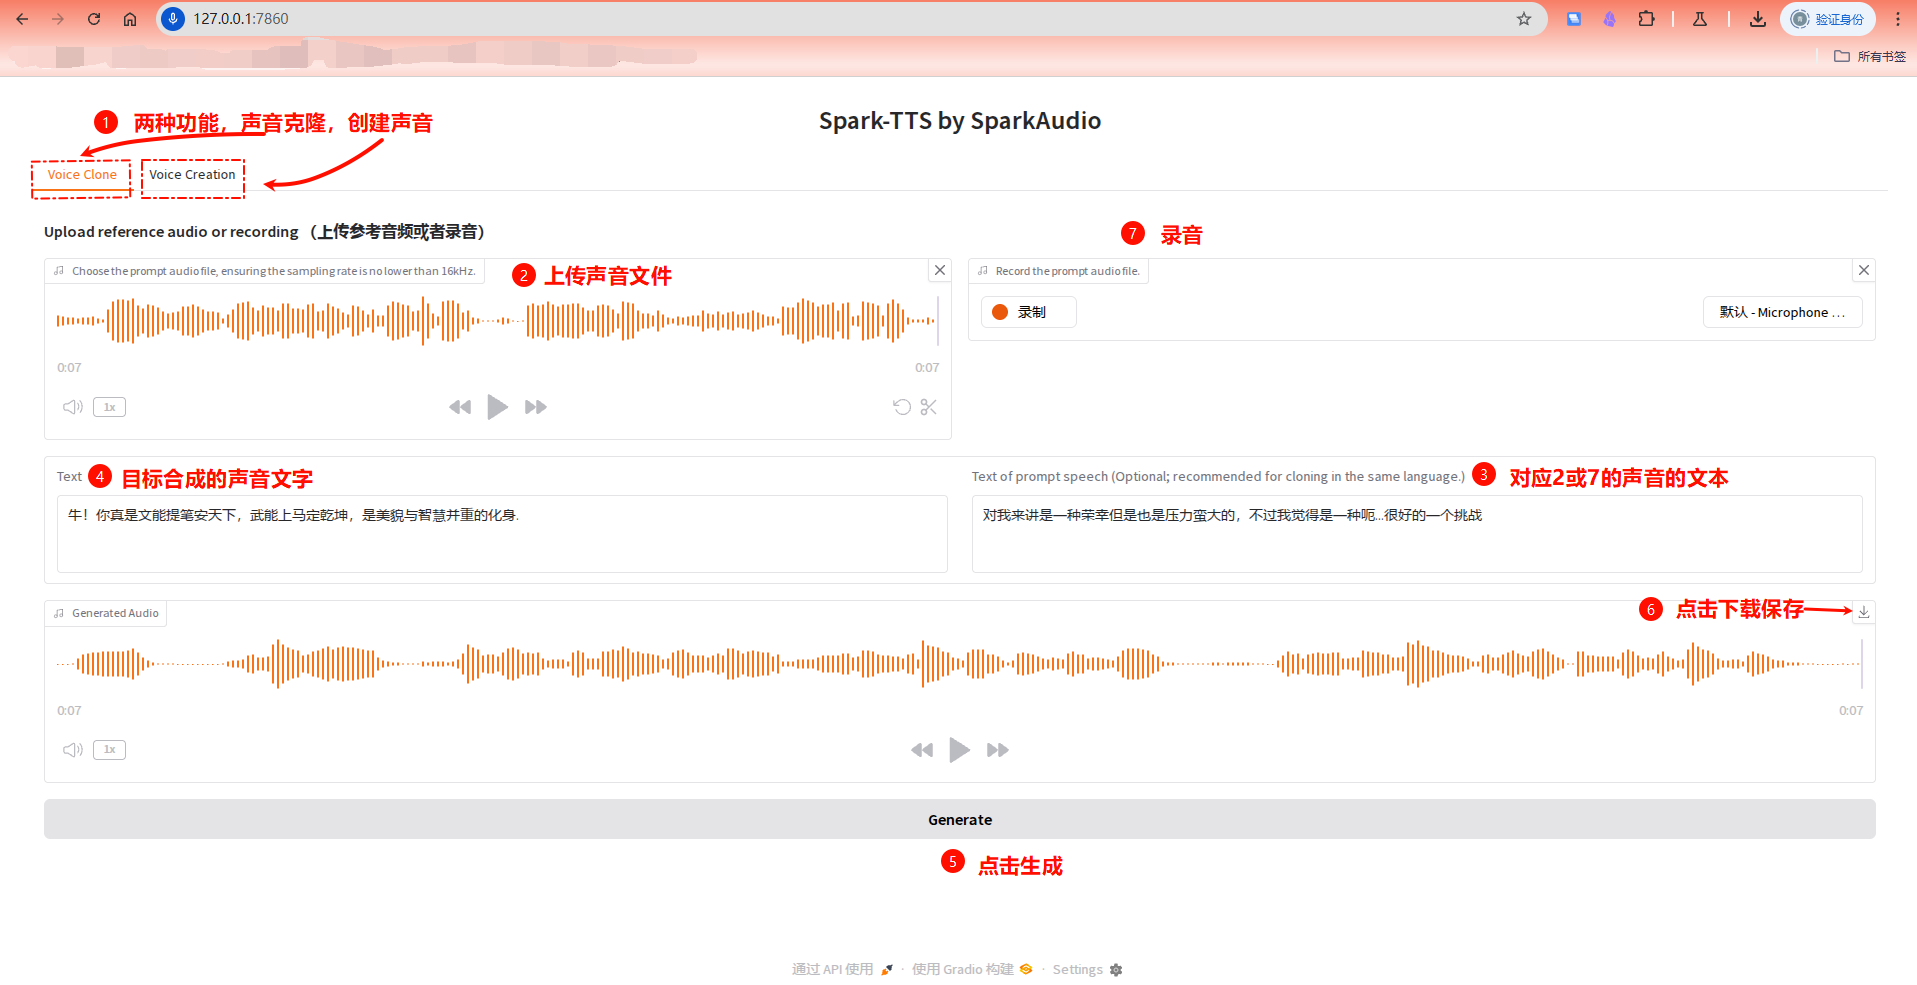
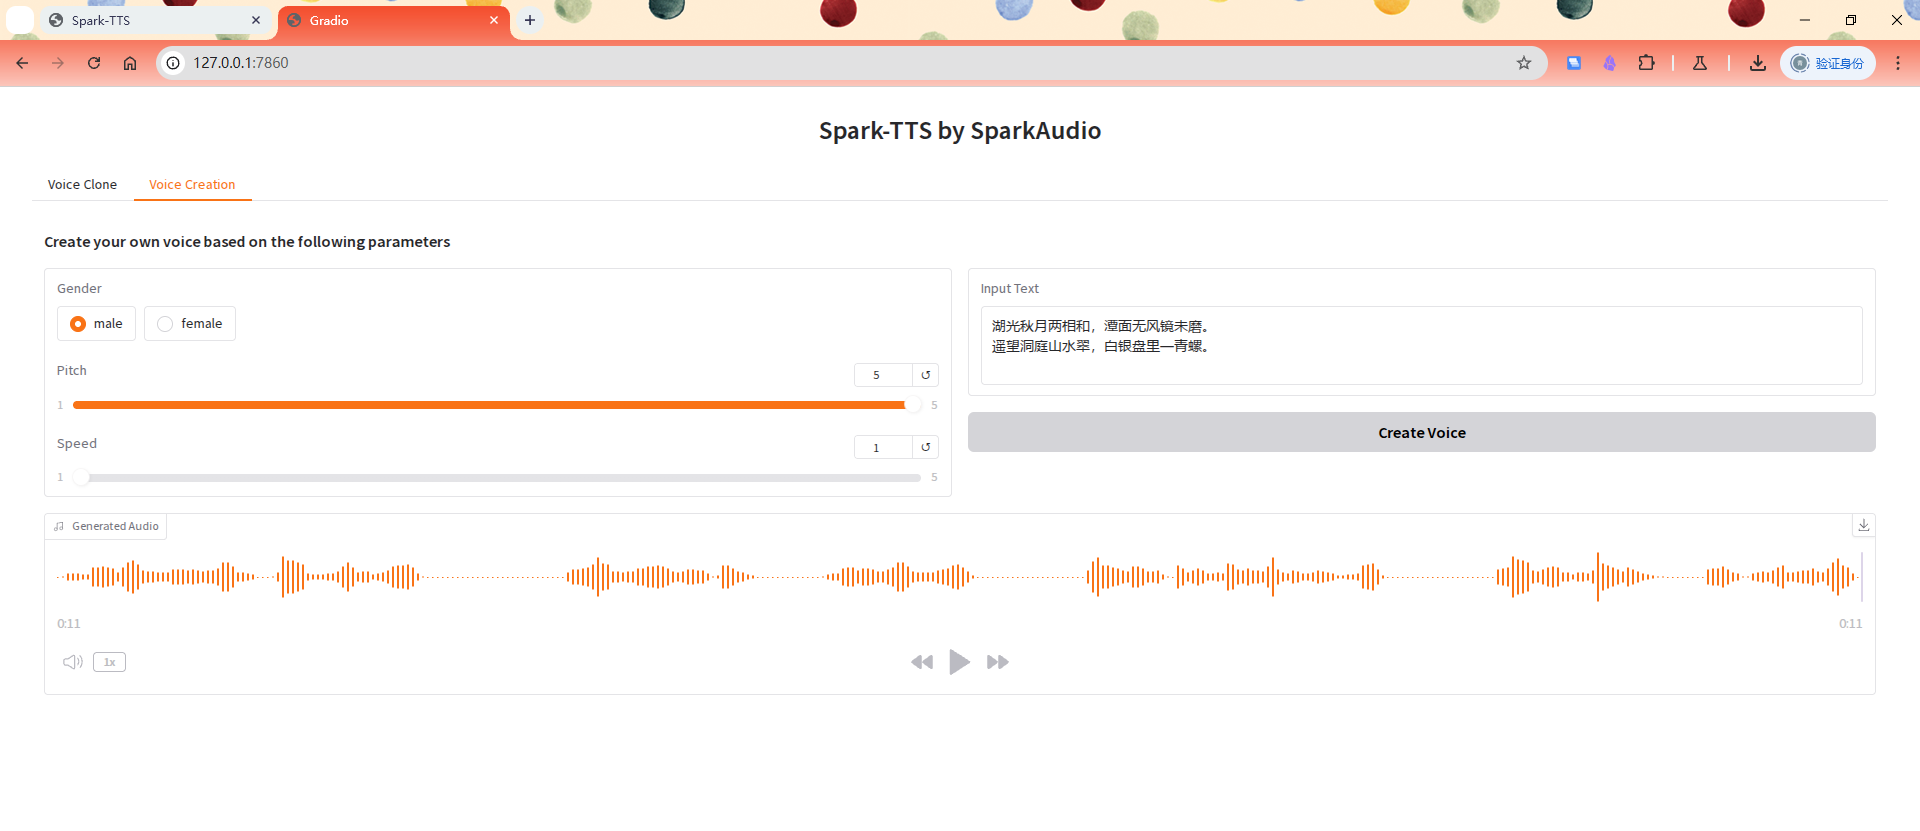
4.2 WebUI
直接用python跑项目自带的webui.py使用gradio图形化界面测试
1
2
#python webui.py也可以
python webui.py --device 0
对应上图的音频如下:
周杰伦原音-参考音频
周杰伦声音clone演示
英文P3S3-male-英文
中文P4S2-女声-中文诗词
中文P4S2-男声-中文诗词
中文P5S1-男声-中文诗词
中文P5S2-女声-中文诗词
五、遇到的问题
PC部署
容易遇到的pytorch和cuda环境问题
1
2
3
File "L:\Users\yeqing\anaconda3\envs\sparktts\Lib\site-packages\torch\cuda\__init__.py", line 310, in _lazy_init
    raise AssertionError("Torch not compiled with CUDA enabled")
AssertionError: Torch not compiled with CUDA enabled
检查了下上述PC操作官方的Git clone下来的requirements.txt里面
pip安装了Pytorch的版本是2.5.1+cpu版本,而非 GPU(CUDA)版本
重新安装一下。CUDA向下兼容PyTorch版本,这样就比较好选了。
1
2
conda active sparktts
pip install torch torchvision torchaudio --index-url https://download.pytorch.org/whl/cu126
另外,PC 本身的NVIDIA CUDA环境查看命令nvcc --version
1
2
3
4
5
6
7
PS C:\W INDOWS\s ystem32> nvcc --version
nvcc: NVIDIA ( R) Cuda compiler driver
Copyright ( c) 2005-2025 NVIDIA Corporation
Built on Fri_Feb_21_20:42:46_Pacific_Standard_Time_2025
Cuda compilation tools, release 12.8, V12.8.93
Build cuda_12.8.r12.8/compiler.35583870_0
可以简单弄一个py脚本检查环境env_check.py
 1
 2
 3
 4
 5
 6
 7
 8
 9
10
11
12
13
import torch
#输出True 表示CUDA\GPU可用
print ( "GPU是否可用:" , torch . cuda . is_available ())
#如果已安装会输出pytorch 版本号
print ( "torch版本:" , torch . __version__ )
#如果已安装会输出cuda版本号
print ( "cuda版本:" , torch . version . cuda )
#如果已安装会输出cudnn 版本号
print ( "cudnn版本:" , torch . backends . cudnn . version ())
例如正常情况的输出如下
1
2
3
4
gpu是否可用:True
cuda版本: 12.6
torch版本: 2.6.0+cu126
cudnn版本: 90501
云端腾讯Cloud Studio
Cloud Studio每月免费10000分钟,16G GPU显卡,32G内存,300多G存储,目前是免费可用。单独记录一个文档
腾讯云服务器Cloud Studio部署SparkTTS
其他例如CosyVoice、ComfyUI也可以用这个主机部署,16G的GPU虽然对要求高的项目、模型也不够用,但是可以跑一些进行学习试用、帮助了解原理。
比如ComfyUI的学习,可以正常跑Flux1-dev-fp8模型,出图速度慢些。
六、总结
利用好Cloud studio平台,可以学习一些需要GPU的项目,目前高性能AI服务器每月免费10000小时。
例如SprakTTS等Github的开源项目,在Cloud studio很就能部署测试了解了。
SparkTTS,kokoro,CosyVoice,等小型的声音克隆相关项目越来越多,各有特点;
例如kokoro是外国的项目,英文强且速度快几乎能实时转录,有人用作英文教学、英文读物配音;CosyVoice和SparkTTS本身是国产的则对中文支持更友好,CosyVoice带一些音色训练、带有方言、流式推理,3秒极速复刻,支持情绪,部署测试体验差。SparkTTS 克隆效果与CosyVoice类似,推理速度快,整个部署体验更流畅。